Config Manager Reporting & The Ultimate Computer Inventory Report
Have you ever wanted to make your own reports in Config Manager but just not had the time to dive in? Me too, but finally I forced myself to sit down and dive in. I'm working on a project right now where we are doing an available application deployment by device, but we want to be able to nag our users by email if they haven't done it yet. So how do you turn a device into an email address?
I decided to make a custom report that shows me a list of all machines in a collection and then gives me some key info, but most importantly it gives me the top console user and their email address. Our user discovery brings in the "mail" attribute for users so this information is already stored in our Config Manager database.

If you don't want to build it on your own, skip to my GitHub and download the RDL.
Part 1: The SQL Foundation
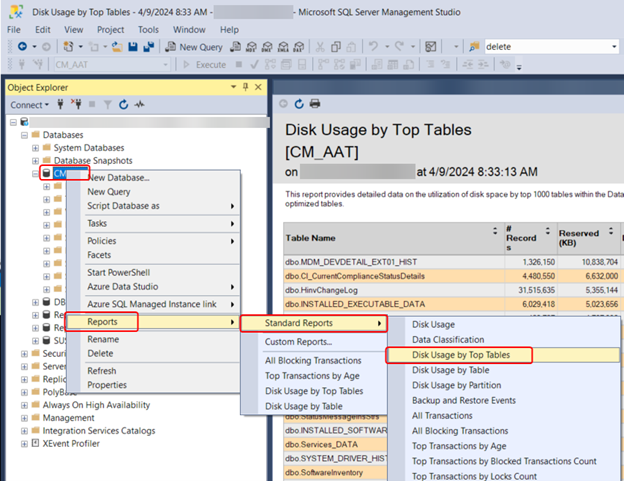
The first step to building your own reports is to open up SQL Server Management Studio and dig through your CM_A01 (whatever your site code is) database looking for views that fit your needs. If you don't know what views to look for open an existing report in Report Builder, expand Datasets, right click on the dataset that contains all the fields from the report, and click on Query. You can copy this out to VS Code to review or you can just look at it plain text here. Make note of what views are referenced. In my example screenshot below, I've highlighted the view names that I used to make the query for this report.

Open SQL Server Management Studio (SSMS), expand the view to your CM_A01, right click on Views, and click New View. In the New View tab that pops up, you'll need to do an Add Table for the views you want to use. There are two ways to do this. You can drag and drop a view from the Views list over to your new view tab. The other way (shown in the screenshot below) is to right click in your new view tab and click on Add Table. Go to the Views tab of the Add Table window, highlight one or more views, and click the Add button. Once you're done adding views, click on Close.

If you haven't figured it out yet, you're building a SQL query (from this query designer GUI) that you will later use to build a new report. Now that you have all your views on the screen, it's time to add some Joins so they can all work together. All the views I selected are Device based, with the exception of one that is User based. I'm going to join all of the Device based views based on the value "ResourceID" which is what Config Manager uses to identify a Device across views. The view that I want to use as my "anchor" is going to be dbo.v_GS_SYSTEM_CONSOLE_USAGE_MAXGROUP. Drag the "ResourceID" from each of the other Device based views and drop it on the "ResourceID" in the dbo.v_GS_SYSTEM_CONSOLE_USAGE_MAXGROUP view. When you do this, you'll notice an "anchor line" now connects them. I have one User based view (dbo.v_R_User) that I want to use in this query to get the users' display name and email address. I'm going to drag the Unique_User_Name0 from the dbo.v_R_User view over to TopConsoleUsers0 on the dbo.v_GS_SYSTEM_CONSOLE_USAGE_MAXGROUP view... these two values match and can be used for this join.
Now that you have completed all your joins, it's time to check the boxes from each table/view that you would like to use. Keep in mind that you might not need to check boxes in every view. In my example I'm using one view as an "anchor" for all my other views, but I don't want to actually display any of the data from it. Once you check the boxes you want, you can create Aliases for each column and set the order you want them to display in. Type in an Alias for each if you want it and then you can drag the rows around by doing a click/drag to the left of the Column column.


You can now run the query to start seeing your hard work pay off. Right click anywhere on the query and click on Execute SQL. You'll now see a table at the bottom of the screen populate with data from your query. Note the columns are in the order you specified and the alias names make it friendlier to view.

Part 2: The Report Building
It's time to create a new report. Open your Config Manager console and go to Monitoring. Right click on Reports and then click Create Report. The Create Report Wizard will start. You'll need to enter a Name for the report, pick a folder in your report structure for it, and then click Next a couple times and close the wizard once it completes. When the wizard closes, Microsoft Report Builder will automatically open. If you don't have it installed, you'll get a prompt to install it.

In the Report Data pane of Microsoft Report Builder, you'll see Data Sources. Under Data Sources, you'll now see one named AutoGen_xxxxxx which is a Data Source unique to your environment. You now need to add a new Dataset to your report which is where the SQL query will come into play. Right click on Dataset and then click Add Dataset. Select Use a dataset embedded in my report, make sure the AutoGen_xxxx is selected as the Data source, Query type is set to Text, paste your SQL query from the previous steps into the Query box, and click on Refresh Fields. You may get a prompt to enter your reporting credentials, so have those at the ready. Assuming you're error free, click OK to save the new Dataset. I've pasted a text copy of my exact SQL query below the screenshot.

SELECT dbo.v_GS_COMPUTER_SYSTEM.Name0 AS [PC Name], dbo.v_R_User.Full_User_Name0 AS [User], dbo.v_R_User.Mail0 AS Email, dbo.v_GS_COMPUTER_SYSTEM.Model0 AS Model, dbo.v_GS_PC_BIOS.Name0 AS [BIOS Ver],
dbo.v_GS_PC_BIOS.ReleaseDate0 AS [BIOS Released], dbo.v_GS_PC_BIOS.SerialNumber0 AS Serial, dbo.v_GS_OFFICE365PROPLUSCONFIGURATIONS.VersionToReport0 AS [M365 Version],
dbo.v_GS_OPERATING_SYSTEM.Caption0 AS OS, dbo.v_GS_OPERATING_SYSTEM.Version0 AS [OS Version], dbo.v_GS_OPERATING_SYSTEM.InstallDate0 AS [OS Installed or Upgraded],
dbo.v_GS_DEFAULT_BROWSER.BrowserProgId0 AS [Default Browser]
FROM dbo.v_GS_SYSTEM_CONSOLE_USAGE_MAXGROUP INNER JOIN
dbo.v_GS_COMPUTER_SYSTEM ON dbo.v_GS_SYSTEM_CONSOLE_USAGE_MAXGROUP.ResourceID = dbo.v_GS_COMPUTER_SYSTEM.ResourceID INNER JOIN
dbo.v_R_User ON dbo.v_GS_SYSTEM_CONSOLE_USAGE_MAXGROUP.TopConsoleUser0 = dbo.v_R_User.Unique_User_Name0 INNER JOIN
dbo.v_GS_OFFICE365PROPLUSCONFIGURATIONS ON dbo.v_GS_SYSTEM_CONSOLE_USAGE_MAXGROUP.ResourceID = dbo.v_GS_OFFICE365PROPLUSCONFIGURATIONS.ResourceID INNER JOIN
dbo.v_GS_OPERATING_SYSTEM ON dbo.v_GS_SYSTEM_CONSOLE_USAGE_MAXGROUP.ResourceID = dbo.v_GS_OPERATING_SYSTEM.ResourceID INNER JOIN
dbo.v_GS_PC_BIOS ON dbo.v_GS_SYSTEM_CONSOLE_USAGE_MAXGROUP.ResourceID = dbo.v_GS_PC_BIOS.ResourceID INNER JOIN
dbo.v_GS_DEFAULT_BROWSER ON dbo.v_GS_SYSTEM_CONSOLE_USAGE_MAXGROUP.ResourceID = dbo.v_GS_DEFAULT_BROWSER.ResourceID
Now that you have your Dataset, it's time to put it into a table. Click on Table or Matrix and you'll get a wizard to create the table.

In the New Table or Matrix wizard, choose the dataset that you created from the SQL query and click Next.

Drag everything from Available Fields to Values and click Next. Click Next one more time and then click Finish.

You'll now see your table with data. Hit Run to see the results. You'll notice a lot of wrapping going on which makes your rows oversized. Drag your columns to a larger size in order to eliminate the row wrapping.

I like to add alternating colors for every other row of data. To do this, highlight the bottom row in the designer. On the Properties pane to the right, click on the Fill to expand it. Then click the dropdown next to BackgroundColor and then click on Expression.

In the Expression window, you'll put in a formula to make every other row a different color.
=IF(ROWNUMBER(NOTHING) MOD 2, "LIGHTBLUE", "SKYBLUE")
After entering that formula, click OK.

Next we want to make sure the headers stay visible as you scroll and that they stay on each page. Highlight the header row, click the dropdown on Column Groups, and check the box for Advanced Mode. Then click on (Static) under the Row Groups side.

When you highlight (Static) under the Row Groups section, you'll get a Tablix Member properties pane on the right side. Set FixedData to True and RepeatOnNewPage to True.

If you save and Run the report now, you should note that your rows are alternating in color and your header stays at the top both as you scroll or change pages. Now we're going to add the ability to filter this report with a Device Collection parameter. You'll need to add a new Dataset to your report. You'll use the same method as the previous Dataset you added. The query and a screenshot of it are both below.
select CollectionID, Name from v_Collection Order by Name

Once you've added the second Dataset, you'll need to add two lines onto the query on the first Dataset you made with all the info. For this example report you will need to join the ResourceID from v_FullCollectionMembership (fcm) to the ResourceID on v_GS_SYSTEM_CONSOLE_USAGE_MAXGROUP which is the first line below and then you'll need to set the variable which is the second line below.
join v_FullCollectionMembership fcm on fcm.resourceid=dbo.v_GS_SYSTEM_CONSOLE_USAGE_MAXGROUP.ResourceID
where fcm.Collectionid= @Collection

Now you'll need to do the final step to add the parameter to the report. Right click on Parameters and then click on Add Parameter.

Name the Parameter Collection and put in a description of Select a collection. Make sure the parameter is set to visible. Under the Available Values section, select Get values from a query. Select the Dataset that you made second for the collections, select the CollectionID for the Value field and Name for the Label field.

Save your report and give it a run. If you did all these steps, it should look like the screenshot at the very top of this post. I've also uploaded the RDL to my GitHub, so feel free to download it if you aren't down for making it from scratch.
Report Download:
Comments
Post a Comment